
MacOS Proxy Integration
This guide may be outdated. For an up-to-date guide please see our documentation.
Bright Data and macOS proxies
Proxies help safeguard your online activities and enable access to websites that might be restricted in certain locations. This guide will assist you in connecting Bright Data’s esteemed proxy services with your macOS, ensuring your internet browsing is secure and swift.

How to integrate proxies with macOS

Navigate to System Preferences:
Click the Apple icon in your screen’s top-left corner and select “System Preferences”.

Access Wi-Fi Settings:
Click on “Wi-Fi” in the sidebar, then click the “Details” button beside your connected network.

Enter Proxy Settings:
Navigate to the “Proxies” tab and select a protocol to configure.

Enable Web Proxy:
Switch on the “Web proxy (HTTP)” toggle to enable it.
*The above will work only for HTTP sites and not for both HTTP and HTTPS so when setting up the proxy you should choose both HTTP and HTTPS and fill both with the same credentials.

Input Server Details:
- In the “Server” field, type brd.superproxy.io.
- In the “Port” field, type 33335.

Enable Password:
Check the “Proxy server requires password” box and input your username and password in the provided fields.
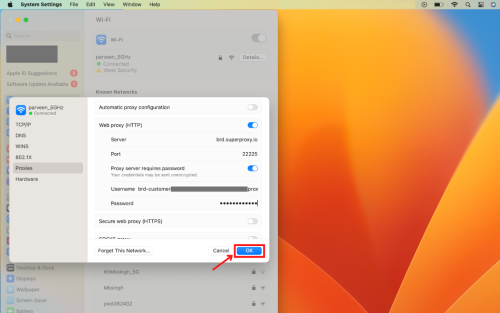
Save and Begin:
Click “OK” to save the configurations.Voila! Your proxy is now active.

Note:
You can find your proxy credentials in the “Access Parameters” tab under your preferred proxy zone within your Bright Data account.
⚠️Important note: If you are using Bright Data’s Residential Proxies, Web Unlocker or SERP API, you need to install an SSL certificate to enable end-to-end secure connections to your target website(s). This is a simple process, see https://docs.brightdata.com/general/account/ssl-certificate#installation-of-the-ssl-certificate for instructions.
Get proxies for macOS

Impulsionado por uma infraestrutura de proxy residencial premiada
Mais de 400M+ monthly de proxies residenciais, a melhor tecnologia da categoria e a capacidade de segmentar qualquer país, cidade, operadora e ASN, torna nossos serviços de proxy premium a melhor escolha para desenvolvedores.
Um proxy para cada caminho de desenvolvimento
Combine redes, peers e IPs para otimizar seu fluxo contínuo de dados da web.


Proxy Network Pricing


- Escala ilimitada
- Assentos ilimitados
- SLA Premium
- 99,99% de disponibilidade de rede
- Gestor de Proxy Gratuito
- Cobertura completa de dados
- Preço personalizado por GB
- Soluções personalizadas
- Escala ilimitada
- Assentos ilimitados
- SLA Premium
- 99,99% de disponibilidade de rede
- Gestor de Proxy Gratuito
- Cobertura completa de dados
- Preço personalizado por GB
- Soluções personalizadas
- Escala ilimitada
- Assentos ilimitados
- SLA Premium
- 99,99% de disponibilidade de rede
- Gestor de Proxy Gratuito
- Cobertura completa de dados
- Preço personalizado por GB
- Soluções personalizadas
- Escala ilimitada
- Assentos ilimitados
- SLA Premium
- 99,99% de disponibilidade de rede
- Gestor de Proxy Gratuito
- Cobertura completa de dados
- Preço personalizado por GB
- Soluções personalizadas
Líder em proxies e coleta de dados


